Quick Guide: Connect a Device
-
Create a new Site for the project
Go to Sites Overview, click “Add Site” and fill out the form. -
Create a Data Source for the EcoPhi Box
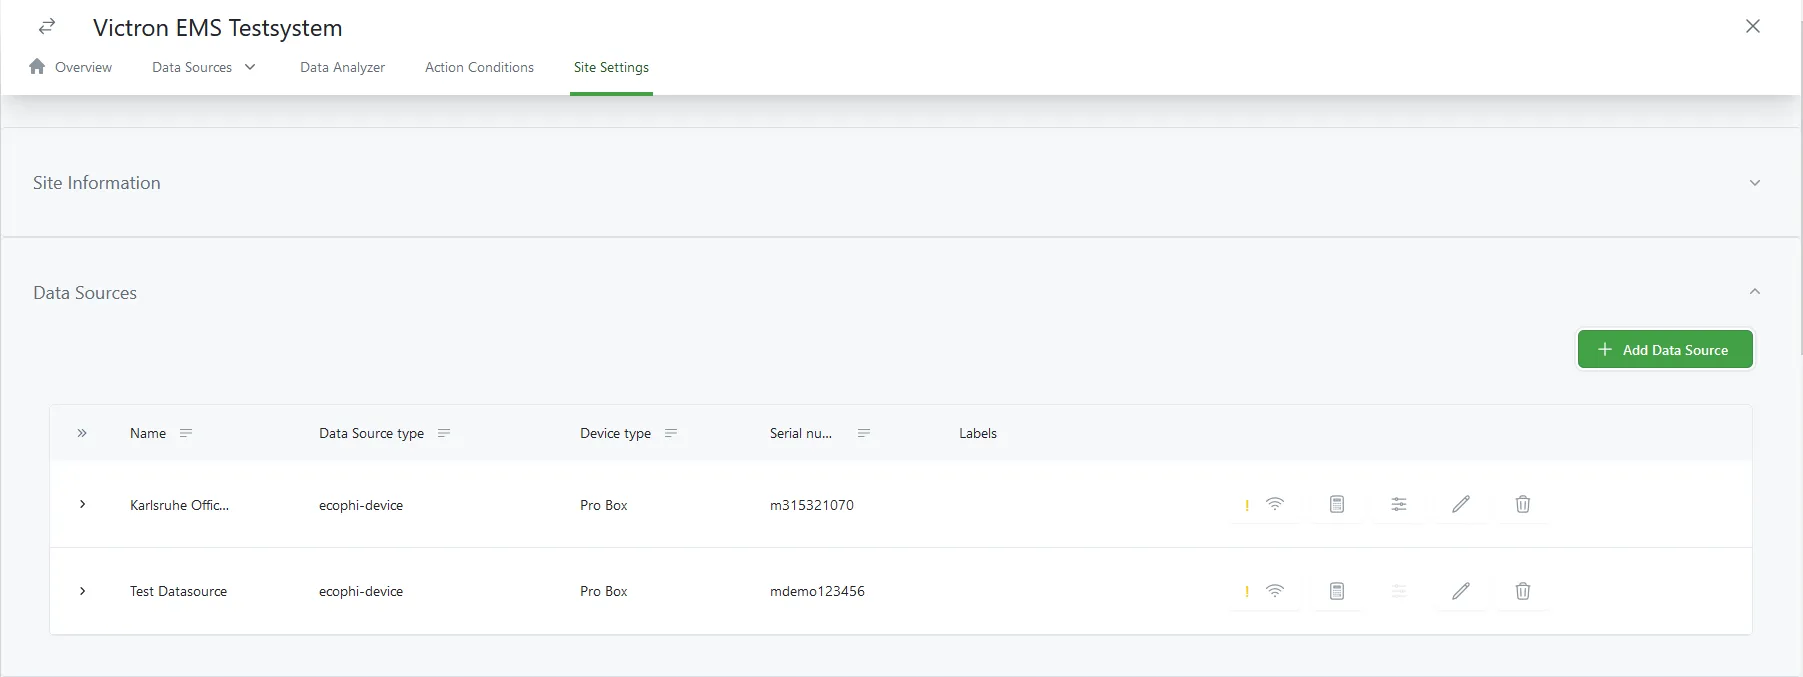
Go to Site Details, open the Site Settings tab, and click “Add Data Source”. Make sure to enter the correct EcoPhi serial number, which is printed on the Box. -
Add Components
On the Site Settings Tab, click “Add Component”, select the Data Source, and fill out the form. Repeat this step for all Components.
Add a new Site
Go to the “Sites Overview” tab in the left navigation bar and click the “Add Site” button in the top right.
To add a location, search for the address. The correct location will be matched with the system. You can change the display title, which will be shown in the Site Overview, to fit your required format.
Click “Add Site”.
You will see the new Site in the Site Overview once it’s created.
Add a Data Source and connect the EcoPhi Box
Watch this video to see how you can add Data Sources to a Site:
Go to “Site Settings” -> Data Sources section and click “Add Data Source”.
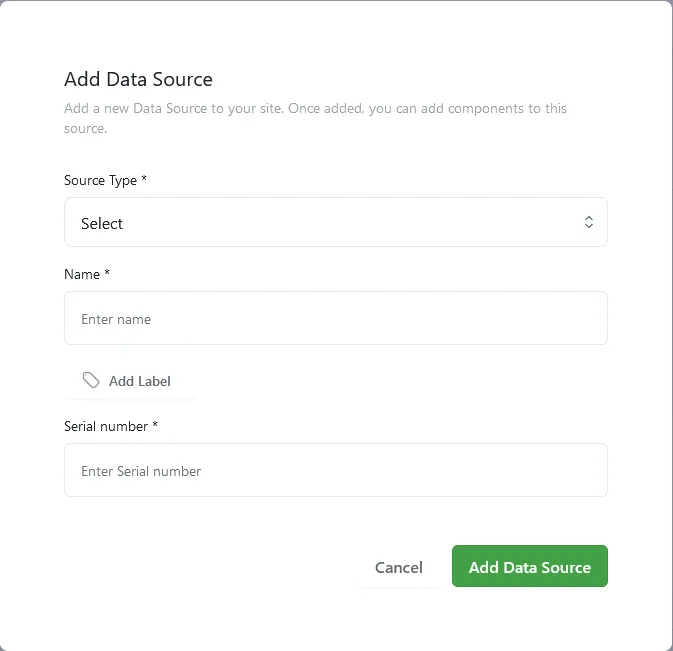
- Source Type: Select “EcoPhi Device”.
- Name: Enter a name that clearly identifies the Data Source.
- Dashboard template: Select a fitting dashboard.
- Serial number: Enter the EcoPhi Box serial number (starting with a lower-case m…). You can find the serial number written on one of the sides of the EcoPhi Box.
Click “Add Data Source”. You will now see the new Data Source.
Connection Settings (Connection Order and Wi-Fi Settings)
After the Data Source has been created, you can configure the Wi-Fi connection settings by clicking the connection icon.

You can change the connection order for SIM, LAN, and Wi-Fi. The connection order defines how the box will try to establish a connection. If it cannot establish a connection using the first priority, it will switch to the next one.
If you are using a Wi-Fi connection, you can enter the Wi-Fi name and password.
Add Optional Meta data
When you set up a Data Source, you can optionally define ecological and economic calculation factors.
Deleting and Updating Data Sources
Click the Edit Data Source or Delete Data Source icon.
Add Components/Connect Equipment to the EcoPhi Box
Watch this video to see how you can add Components to a Data Source:
On the “Site Settings” tab, click “Add Component”.
Data Source: Select the correct Data Source.
Name: Enter a name that clearly identifies the Component.
Component type: Select the correct Component type from the list. Depending on the Component type, different settings need to be made.
Serial
Select the correct Equipment from the list, enter a read-out interval, enter the Modbus ID and an optional IP address and port.

Modbus ID
All serial components require a unique Modbus ID.
IP Address
Required for Modbus TCP connections. Not used for RS485 connections.
Port
- Modbus TCP: The TCP port of the target device (typically 502).
- RS485: The physical serial port on the EcoPhi Box (usually port 1, optionally port 2).
Role
The role defines which system parameters are monitored by the component and whether it needs to be controlled as part of an automated energy management setup.
Roles also define whether a Component should be used to calculate a total metric, such as total solar power or total grid power. The total values are calculated on the device in a separate thread.
| Role | Description |
|---|---|
| 0 | No role |
| 1 | Grid meter (reference) |
| 2 | PV inverter (controllable) |
| 3 | Battery inverter |
| 4 | Generator |
| 5 | Flexible load |
| 7 | Other renewable energy source (use this as PV reference from an energy meter) |
Example: An energy meter can be defined to measure the Grid, Load, Solar or Battery power. These measurements will then be reflected in the total system values.
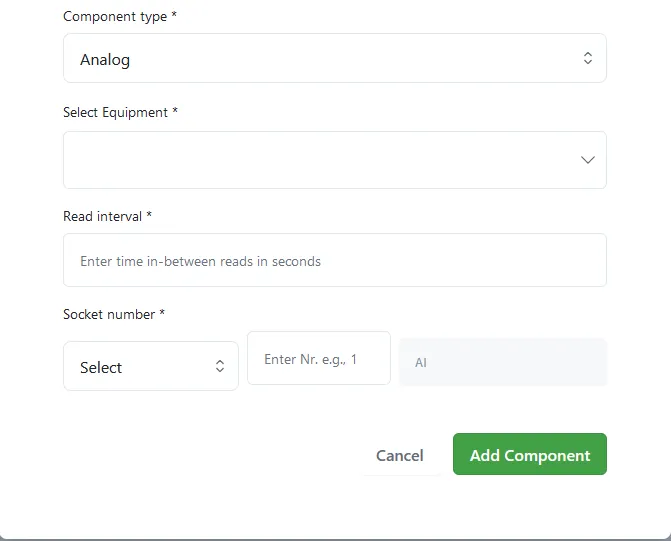
Analog
Select the correct Equipment from the list. Make sure to select the correct measurement range which matches your sensor specifications. The measurement range and sensor type is usually printed on the sensor.
Enter the read-out interval.
Enter the correct socket number. You can define the Component as an analog input or analog output.
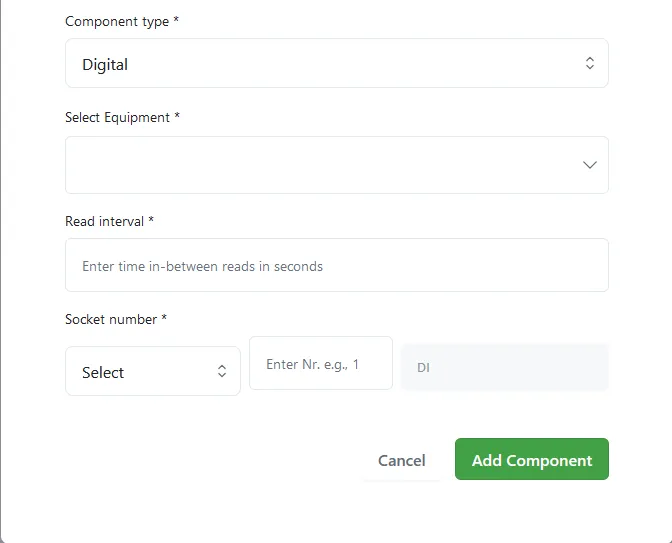
Digital
Select the correct Equipment from the list. In case of a digital pulse sensor, make sure you select the equipment with the right pulse ratio.
Example: Some digital pulse water meters count 10, 100, or 1000 liters per pulse. Selecting the wrong pulse ratio will therefore lead to incorrect measurements.
Enter the read-out interval.
Enter the correct socket number. You can define the Component as a digital input or digital output.
Duplicating Components
To add similar Components more quickly, you can duplicate existing Components. Click “Duplicate Component” on the right side of the Component to create a copy.
Deleting and Updating Components
To delete or update Components, go to “Site Settings” -> Components. On the right side of the Component, click on the Edit Component or Delete Component icon.