

Device Setup: PowerTracker N20/ N50
Installation and setup manual
Introduction
- PowerTracker Hub + Probes form an independent LoRa network (433MHz or 868MHz)
- No settings are required from the user to connect the Probes
- Antennas are installed inside the boxes and usually don’t need to be placed outside
- In an open field, a range of several kilometers is possible
- Buildings or other massive elements reduce the range
- The more devices are installed, the better the network will be
Make sure that the installation is carried out by qualified personnel only!
1. Short Manual
- Connect with LAN, SIM or Wi-Fi
- Install the Probes
- Connect the power supply
2. Connection Settings
Info: If you have ordered an EcoPhi Box with SIM card service, you can skip the connection settings as the Box will automatically connect with the provided SIM card. The EcoPhi Box must be turned on to do the connection settings.
There are 3 ways to connect: LAN, SIM and Wi-Fi. During the first setup, the device should be connected to a LAN connection if the APN or Wi-Fi is not yet set. Due to the connection quality, it is generally recommended to connect the device via LAN during setup. Depending on the mobile data provider, the SIM needs manual settings. For this, the device should be connected via LAN. If the SIM card works directly, this is not necessary.
2.1 Connection settings via the EcoPhi platform
If you use LAN, you don’t need to do the online settings. Log in to the EcoPhi platform (www.ecophi-monitoring.com) and open the “Device Setup” dashboard.
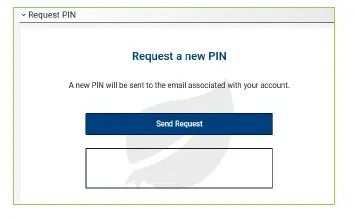
Info: To be able to make device settings, you need access to the EcoPhi platform and a PIN. If you haven’t received a PIN yet, open the “Request PIN” tab. An email with your PIN will be sent to your email address. Check the Spam, if you haven’t received the mail.
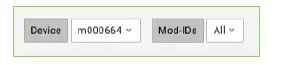
On top of the page under “Device”, select the correct Device ID (the Device ID is printed on the outside of the EcoPhi Box). Nothing needs to be changed under ” Mod IDs”.
The “Device Status” indicates whether the EcoPhi Box is currently connected. “Connection Mode” shows the connection type (LAN, WLAN, SIM).
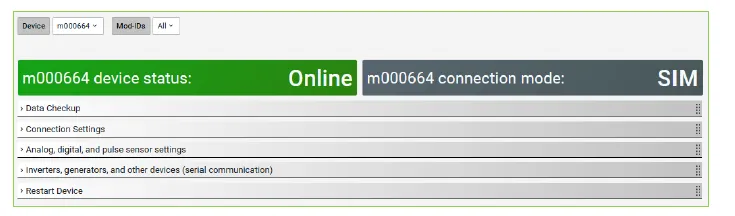
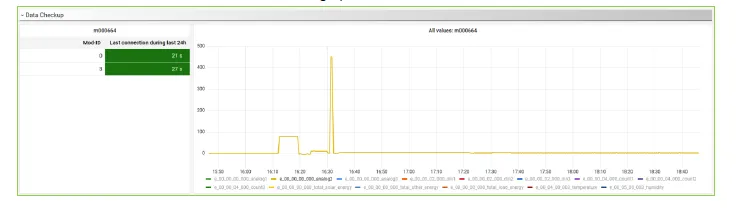
Under “Data Checkup” you can see when the last time a connection to the EcoPhi Box was established and you can check all transmitted data in the “All values” graph.
Switch to the “Connection Settings” tab.
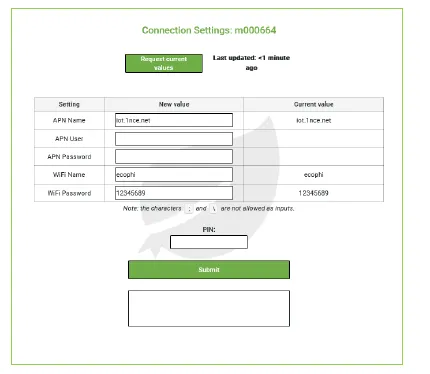
Click on “Request current values” to request the current settings from the Box. A query is sent to the EcoPhi Box, after which the EcoPhi Box sends the current settings. A timer of 10 seconds is set for this.
2.2 LAN Connection
Open the cover of the EcoPhi Box with the attached key. Insert a LAN cable through the open cable channel marked “LAN” of the EcoPhi Box and connect it to the “ETH” port of the data logger. You don’t need to make additional settings for establishing the LAN connection. The box will now automatically establish a connection. If no connection is being established, please restart the device (see instructions below). LED A of the data logger is permanently red when a LAN connection is established. When flashing red, an attempt is being made to establish a connection.
2.3 SIM/ Mobile Data Connection
Important! Make sure that the SIM card is topped up with mobile data and that no PIN is required!
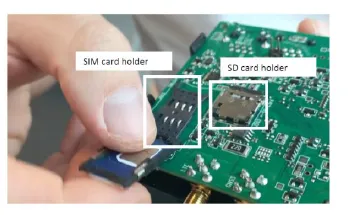
Open the EcoPhi Box, open the data logger inside and insert the SIM card:
- Take out the cover of the data logger to get access to the circuit board.
- Slide back the metal clip on the SIM card holder and fold it up.
- Insert a local SIM card with internet connection and without a PIN code.
- Close the SIM card holder and fasten the metal clip.
- Put the cover back on the data logger and close the data logger.
Log in to the EcoPhi platform and open the “Device Setup” dashboard. Very often it’s not required to enter the APN details manually. If you are not sure, you can try it with your SIM card by just inserting the SIM card without changing the APN details. The device might need 20 minutes for the first connection, but entering the APN manually is not always required. To change the settings online, go to the “Connection Settings” tab and enter the APN data. You can get the APN information online or directly from the mobile data provider.
Confirm the entries with your PIN. The connection settings are not applied until the system is restarted. For a restart, switch to the lower tab “Restart Device”. Confirm the restart with your PIN.
Info: As long as the EcoPhi Box is connected via LAN, this connection will be prioritized. To check the SIM and Wi-Fi settings, you have to disconnect the LAN connection first.
LED A is permanently green when a SIM connection is established. When flashing green, an attempt is being made to establish a connection. If no connection is being established, restart the device again.
2.4 WLAN/ WIFI Connection
If you want to establish a Wi-Fi connection, the device first has to have a connection via LAN or SIM. To establish a Wi-Fi connection, enter the Wi-Fi name and the password under the “Connection Settings” tab. Note: The characters ”;” and "" are not valid and therefore cannot be part of the Wi-Fi password.
Confirm the entries with your PIN. The connection settings are not applied until the system is restarted. For a restart, switch to the lower tab “Restart Device”. Confirm the restart with your PIN. Info: As long as the EcoPhi Box is connected via LAN, this connection is maintained. To check the SIM and Wi-Fi settings, you have to disconnect the LAN connection first. LED A lights up orange continuously when a Wi-Fi connection is established. When flashing orange, an attempt is being made to establish a connection.
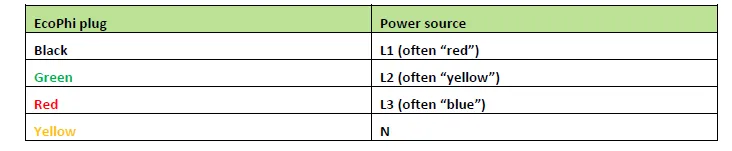
2.5 Preparation of the current clamps (Current transformers)
Pre-assembled current clamps
If you have ordered pre-assembled clamps, the current clamps are already prepared and connected to the EcoPhi plug and you can skip this step.
Not assembled current clamps
If you have not ordered pre-assembled clamps, you need to prepare the current clamps by connecting them to the EcoPhi plugs before using them. The EcoPhi Audit Box comes with the selected current clamps and the matching plugs.

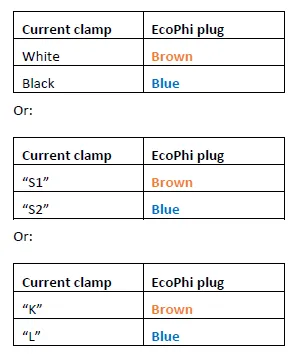
Depending on the size of the clamps, they have either a cable or a labeled terminal. When connecting the current clamps to the EcoPhi plugs, make sure that the connection is done professionally. Depending on the type and size of the current clamp, connect the clamp to the EcoPhi plug as follows:
3. Installation
In order to use the Audit Box for monitoring, it has to be set up initially. Make sure, the box has already been prepared as described in Chapter 2 “Initial Setup”.
3.1 Connecting PowerTracker Probes to the PowerTracker Hub
Newly installed probes are automatically recognized and integrated after some time (1-40 min). A readout frequency of 5 minutes is used by default. However, it is possible to connect probes directly and set the readout frequency.
3.2 Connecting the current clamps
Make sure that each current clamp is around the phase which it is supposed to. (Phase 1 to L1, Phase 2 to L2 and Phase 3 to L3). If these are mixed up, the results will massively be spoiled. When you disconnect a current clamp, first remove the current clamp from the cable of the measured phase and then disconnect the clamp from the EcoPhi Box.
a. Plug the connector of one of the current clamps to the Audit Box (Phase 1-3) (a clicking sound indicates a correct connection.
b. Open the current clamp.

c. Place the cable of the phase you to want to monitor into the current clamp.
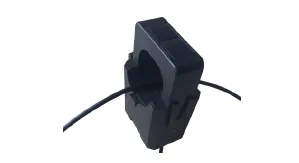
d. The current clamps have an arrow symbol engraved. In this case, make sure that the arrows engraved into the current clamps point into the direction of positive power flow, so the arrow has to point into the direction of the power source.If you disregard this step, the power values measured will be negative.
e. Close the clamp.
f. Repeat steps a) - e) for all three clamps and phases.
3.3 Connecting the Box to the power supply
Important notice: Make sure that you turn off the power or work on a secure line when you connect the EcoPhi connector to the power source! Notice: Make sure that the phases match the current clamps plugged to the Audit Box. Otherwise, the measurements will be wrong!
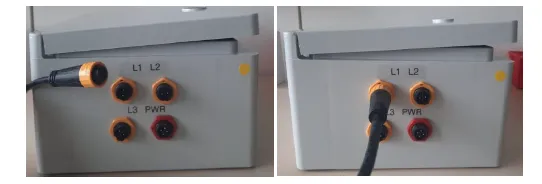
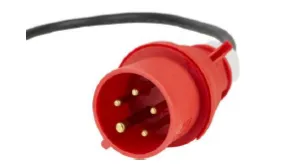
a) Connect the endings of the EcoPhi plug to the phases of the power source according to the right color coding.
Option 1: Each of the endings of the EcoPhi plug needs to be connected to these phases of the power supply individually. Option 2: If a three-phase socket is available, use a CEE three-phase plug to extend and connect it to the EcoPhi plug. If you have ordered the Audit Box with pre-assembled cables, this plug is part of your Audit Box delivery.
b) Connect the EcoPhi power plug to the PWR/ Power connector of the Audit Box.
c) Turn on the power of the power source.
The Audit Box will directly start sending data. Please directly check the data (Chapter 4.1), to see if all current clamps and phases are connected correctly. Negative powers indicate that the current clamp is placed in the wrong way.
In this case, open the current clamp, turn it around and close it again. Power factors which don’t make sense usually indicate, that the current clamp and the phase don’t match. In this case, make sure that all phases and current clamps are connected in the right way.
Careful:
Three mistakes that can happen during installation and can lead to incorrect values are:
- Current clamp installed the wrong way: Negative power values
- Phase and current clamp do not match: Wrong values
- Wrong current clamp size settings: Wrong factor
To avoid wrong values, please make sure that the current clamps match to the right phases. You can check the dashboard to see if there may have been an error during installation. In the upper area of the dashboard you will see a note in red if error 1. or 2. has been detected.
Please then check the corresponding components. Note: In order to receive reliable warnings, the system must be connected and running with at least 5% of the power.

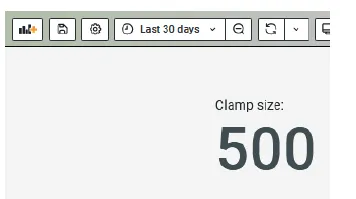
3.4 Change the current clamp size
The current clamp size is displayed in the upper right corner of the dashboard. Make sure that this number corresponds to the current clamp size. You can change this setting in the bottom row “Settings” under “Set Clamp Size”. Select the correct size from the list and confirm the entry with your PIN.
3.5 Disconnecting the Box
First, turn off the power supply and disconnect the endings of the EcoPhi power plug. Carefully turn the wheel on the EcoPhi power plug and disconnect it from the box. To remove the current clamps, first remove them from the cables of the measured phases. Then disconnect the current clamps from the EcoPhi Box.
4. Operation
4.1 Check the system operation
To check your system and see the data, log in to the EcoPhi platform (www.ecophi-monitoring.com). You should have received an email with your login information. Reach out to EcoPhi by opening a support ticket under https://ecophi.io/support-ticket-form if you haven’t received your login credentials. After logging in to the platform, you see an overview of your devices on the right side. Click on your device to get to the device dashboard.
Overview
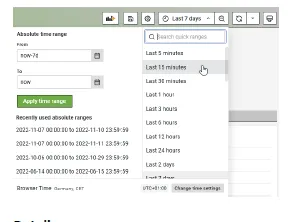
Here, you find an overview of the energy and power measurements. You can change the time ranges on the top right to either select a relative or absolute time range.
Details :
Here, you find detailed graphs of the measured values.
Export :
Here you can export your device data as a csv file, create a standard audit report or request a report by EcoPhi. The data of the csv and standard report will be based on the selected time range on the top right.
4.2 Get locally stored data via SD card
a) The SD card is located next to the SIM card b) Slide back the metal piece on the card holder c) Pull out the SD card
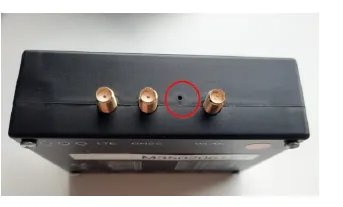
4.3 Restart the Box
To restart the device, press the button between the GNSS and WLAN antenna ports on the datalogger with a small needle or paperclip.
5. Troubleshooting
I have inserted a SIM card but the device doesn’t connect to the cloud:
Does the SIM card have a PIN? It is important to remove the PIN.
Does the SIM card have mobile data available? Make sure that you have mobile data.
Make sure you have the correct APN information from your SIM provider. If possible, try to connect the device to LAN first.
Otherwise you can remove the SIM card and create a mobile hotspot, with name: aveefunky_2,4 and password: funky2015avee2019 Once the device is connected to either LAN or Wi-Fi, make the correct APN settings online (see instructions above). Restart the device after that.
I have connected the current clamps but I am seeing negative power values on the dashboard:
Check, which of the phase(s) is negative.
Turn the current clamp around at this phase.
My measurements don’t seem to make sense:
Make sure that each current clamp matches the right phase.
Check, which of the phase(s) is negative. Turn the current clamp around at this phase.
Both wrong phases and wrong direction of current will lead to wrong measurements.
6. EcoPhi support
The device ID is printed outside of the box (the number starts with “m…”). Make sure you provide this number when you contact the EcoPhi support. In case you have difficulties setting up your EcoPhi Monitoring Box, we are here to help you. Please contact the EcoPhi support by opening a support ticket using this link: https://ecophi.io/support-ticket-form